The Peacock Marble Story
Introduction
The store has been selling marble and limestone vases, platers, canisters, and other products for many years. People often ask us how they are made. They assume that the rock is very hard and difficult to work with. This is an attempt to show how these types of products are made.
In the spring of 2009, my wife Pat and I joined Frank Wang for a 3 1/2 week buying trip to China. While we were there, we visited the JK Stone factory owned by Frank and his dad David. The factory processes Peacock Marble into a variety of finished vases, table tops, carvings, canisters, bowls, and other products.While we were at the factory, Frank and I also went to the mine where Peacock Marble is extracted.
This report begins with a discussion of the mine and the geology of the deposit and is followed by a description of the process to make the various products.
The Mine
The mine is operated by Fumin Zhongbau Stone Industry Co., Ltd. (FZSI). It is located approximately 60 Km northwest of Kunming near Shuli Village, Dongcun Town, Fumin County, Yunnan Province, China. It is about 185 meters (600 feet) above the valley floor at an elevation of about 1700 meters (5500 feet) above sea level. FZSI has a lease along 4 Km of the deposit.
I was not able to get detailed geological information on the deposit while I was there . As a result, the geology has been generalized. Peacock marble is Permian (?) in age and is approximately 20 meters thick. It outcrops for several Km along an east-west (?) trending ridge and dips to the north into the mountain. The marble is a metamorphosed limestone placed under great pressure and heat and then recrystalized during the Himalayan Uplift. The marble is multicolor and mottled. Trace amounts of various metallic elements give the marble its color. Iron is the major coloring agent with lesser amounts of carbon, manganese, copper, cobalt, and chromium.
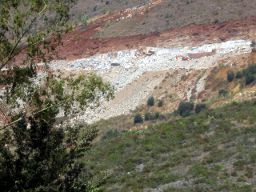
An overview of the mining operation from below
.
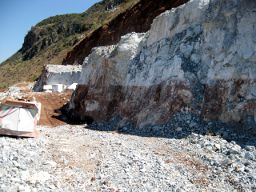
A portion of the mine where three distinct layers of marble are exposed. The uppermost layer is lighter colored, the middle layer is grey and white, and the lowermost layer is multicolored.
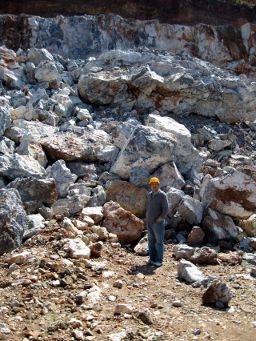 The rock is mined by drilling holes around the perimeter of the small areas to be mined. The drill holes are filled with powder and blasted. This picture shows the size of the marble blocks that are broken off. (Frank is in the picture for scale.) The blocks of marble are hauled by truck to the valley floor and then about 2 Km to the JK Stone factory for processing.
JK Stone Factory
First, an overview of the factory will be presented. Then, a description of the processing of the marble into various products will be presented.
Overview
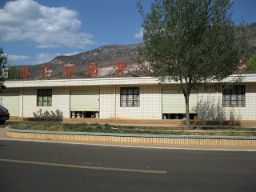
The showroom for finished products at the factory. In the center of the picture above the showroom, you can see the mine, which is about 2 Km away and about 1/3 of the way up the mountainside.
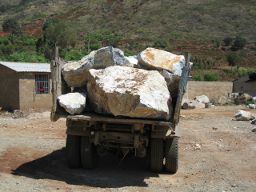
This picture shows a truckload of the marble blocks before processing
 This is the rock yard between the showrooms and the processing area. There were about 250 to 300 tons of rock available for making products.
 This is the inside of the actual work area of the factory. David in a white and gray shirt and Frank in a gray shirt and blue jeans are the owners of the factory. I'm the one with the blue shirt and the bald head. The two people wearing hats are workers.
 This is the other end of the work area with several lathes.
Processing
Now that we've seen the mine and the general layout of the factory, let's see how the rough rock is turned into the fine marble products we sell.
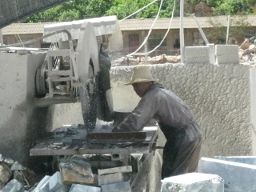
 The first step is to saw the large blocks of marble. This picture shows two workers getting ready to saw a block of marble into smaller blocks. This saw is about 1.7 meters in diameter.
 Then, the blocks are sawed into yet smaller pieces with the saw shown in this picture. The blocks from this process are slightly larger than the size of the expected pieces to be made.
The turning of the products is done on lathes using tungsten carbide tips. Some of the lathes are capable of turning pieces about 1.7 meters long by .7 meters in diameter with pieces weighing over 600 Kg to start with.
While turning the pieces, an occasional fracture or other imperfection in the rock is encountered. When this happens, they stop the lathe just long enough to patch the imperfection with an epoxy based substance. Then, they continue turning. In most cases, it isn't obvious where the repairs were made. All of the rough turning is done dry. The sanding and polishing are done wet.
 This picture shows a block of marble attached to the lathe. The block was glued to a smaller piece of marble that fits into the chucks on the lathe. Now the turning begins.
 The workers start by turning the outside of the piece. This picture shows a vase in which the outside has been turned.
 This picture shows a worker turning the inside of a vase. The angle that the tools cutting the insides of the product can be adjusted so the inside of the vase can be variable diameters.
 This picture shows the vase in the previous picture with all the rough turning completed.
 This picture shows a larger (16x16 inch) vase being turned on one of the larger lathes.
 After the rough turning is done, the next stage is sanding.
 The sanding is done with wet silicon carbide sandpaper. Various grades of sandpaper from coarse to very fine are used to smooth the vases and remove all scratches from the vase. Note the pan of water to wet the sandpaper under the vase.
To finish the process, a nylon scrubbing pad, similar to what you would use to wash dishes, is dipped into an oxalic acid solution. This pad is used for the final polish stage. The combination of the heat from turning and the chemical reaction between the marble and the acid produces the fine polish. We don't have a photo of this stage.
 Finally, the vase is cut from the block holding the piece in the chuck of the lathe. This is a finished vase. The entire process from start to finish takes several hours per piece.
 To do a tabletop, the same process is used. However, a saw that cuts multiple slabs at once is utilized in the initial stage. This picture shows the machine that sands and polishes the tabletop slabs.